How to make a summer shower with your own hands: what types of designs are there?
After a hard day at work at the dacha, you want to refresh yourself and wash away the fatigue. An indispensable attribute is a summer shower. You can do it yourself, but you need to think through some small details during construction. How to make a summer shower at the dacha?
Content:
- Summer shower in the country: description and advantages
- Location and type of construction
- Tools and materials for work
- Step-by-step instructions for making a shower
Summer shower in the country: description and advantages
The shower stall can be open or closed, depending on the preferences of the owners, it can also be semi-closed. According to the method of water supply, showers can be:
- Plumbing
- Capacitive
In the first case, it will be necessary to make a central water supply. Capacitive showers involve the presence of a container above the top shower head, which is heated by the sun's rays. A cabin for a summer shower made of wood will look original.
For façade finishing, you can choose any material. At the same time, it is important to protect the wood from rotting and other factors, and from high humidity. Wood is a universal option from which you can create any cabin design. In addition, wood is easy and convenient to work with.
Thanks to a summer shower, it is possible to carry out water-hygienic procedures at the dacha if the appropriate communications are not installed in the house. In addition, the shower can serve as a design element for a summer cottage.Using various materials, you can create an original shower not only inside, but also outside.
Location and type of construction
To build a summer shower, you should choose a place. The cabin must be installed in a well-heated place. An outdoor shower can be done near a blank wall of the house or in an area where there are no high fences. It is not advisable to locate the cabin in the shade of trees or in a part where buildings will block sunlight.
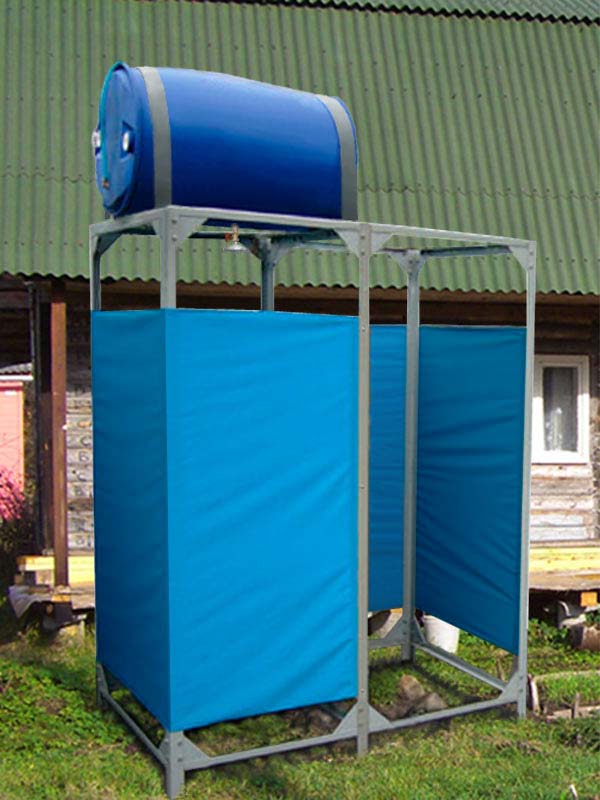
The water will take a long time to heat up and will be slightly warm. In a suburban area, you can make a shower stand, panel or cabin. You can make a stand shower yourself or purchase a ready-made structure. Such a stand can be seen next to the pool, in the garden or on the lawn.
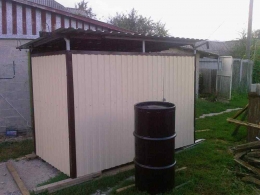
The shower panel is fixed to a support: wall, facade, fence, terrace. In this case, the wall is protected from moisture. You can tile it or temporarily hang cellophane film. The shower cabin is a closed structure with a decorative screen or doors.
The cabin can be aluminum, steel or wood. The last option is the most common. There are a large number of cabin options, but the most budget option is a simple film shower. This shower will only last one season. This design is portable and can be placed anywhere.
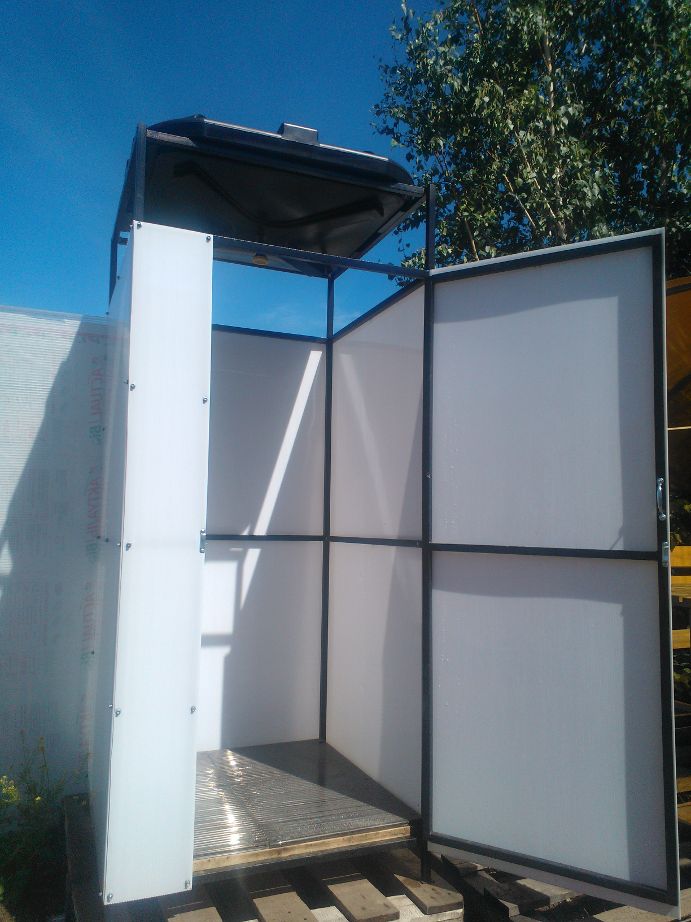
If you plan to build a durable structure, then it is better to make a frame shower. This design can be rectangular or square. The optimal dimensions of a shower stall are: width 100 cm, length 80-120 cm, height about 2 meters.
Tools and materials for work

To make a wooden cabin you will need the following: materials:
- Boards and beams
- Lining
- Ruberoid
- Corrugated sheet
- Polycarbonate
- Water container
You can buy a shower barrel on the market. The best material for a barrel is steel, iron or plastic. A plastic container weighs less and is also easier to mount at a height. A tank with a flat bottom can also serve as a roof. The only drawback of such a container is the low degree of winter hardiness, so it will need to be removed for the winter.
The iron tank is more bulky. It also needs to be washed to remove rust. Unlike plastic ones, they heat up more slowly and take longer to cool down. It is advisable to choose a cylindrical shape, then the water will heat up faster. Tools you should prepare:
- Shovel
- Hacksaw
- Bulgarian
- Hammer
- Self-tapping screws
- Building level
- Master OK
- Drill
Before proceeding with the construction of a summer shower, you should sketch out a drawing of the future structure.
Step-by-step instructions for making a shower
Construction A summer shower at the dacha involves performing the following stages of work.
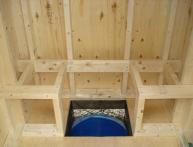
Site preparation. At the site of the future summer shower, dig a hole about 50 cm deep and 100 cm wide. To prevent the soil from falling off, you can put several car tires at the bottom. Cover the hole with roofing felt or thick PVC film on top. Next, place the metal tray so that it is slightly inclined towards the side of the water drain.

To drain the drainage, a drain pipe is placed under the pan into the drainage hole. Installation of support pillars. The next step is to bury beams or iron pipes in the ground. The support pillars must stand straight; this is checked using a building level. Next, fill the base of the submerged beams with concrete and wait 2-3 days for the solution to harden.
Pole tying. Then connect the support pillars in the upper and lower parts with beams.The frame structure must be reliable, since in the future a water tank will be installed on it. Lay about 10 floor boards on the bottom trim, leaving 2-4 cm gaps between them. This is necessary to ensure that water flows into the pan, otherwise the floorboards will quickly begin to rot.
Construction of shower cabin walls. The boards are pre-treated with drying oil, which prevents moisture from penetrating into the wood and thereby protects the wood from fungal diseases. They are assembled and nailed. If necessary, you can make a small window measuring 10x30 cm to allow light into the shower. You can do without a window.
The outside of a summer shower can be finished using any materials: clapboard, plastic, polycarbonate, siding, etc.
Roof installation. Drill a hole in the slate for the pipe from the water container and place the sheets on the top of the cabin. Secure the roof with self-tapping screws. Next, make a grid of beams that will serve as a support for the water tank. The boards should be placed between the waves of slate. Then install a 100 or 200 ml container on the roof.
You must first make a hole into which the pipe with the tap will be inserted. It must be clamped with rubber gaskets and washers so that the pipe does not fall out. The next step is to install the door. At the final stage, put the nozzle from the watering can on the pipe.
No special knowledge or skills are required to build a summer shower. It is important to follow the sequence of work and adhere to these recommendations.
A budget-friendly and quick way to make an outdoor shower
To create a simple shower in the country you will need a tank, a faucet, a shower head, a mat, a film and 4 racks. In a sunny area, dig 4 pillars and secure the tank on top.It is advisable to choose a black color: the water will heat up faster in it.
Then connect a hose to the tank to supply water and attach a watering can. Place a mat on the ground and cover the structure itself with plastic wrap. This simple shower will only take 2-3 hours to create. This budget option for a summer shower is distinguished by its mobility: it can be easily moved to another place, and removed altogether for the winter.
Video on how to make a summer shower at the dacha yourself:


Comments
The main thing is to make a frame and supply water, I had water in my yard, placed the shower as close as possible to the water supply and sewerage system. I had 4 logs, cleaned them, varnished them, prepared holes about half a meter deep, dug them into the ground, then lined them with burlap using construction stapler, I put a tray from an old shower stall under my feet, I stuffed beams onto logs for the storage tank, now I change them every year, I take off the tank and burlap for the winter, I’ve been using it for 3 years, the logs are of course deteriorating from the influence of the environment, but they’ll last a couple more years , and then I’ll just make new ones, I’m thinking about using concrete pillars - they’ll be more durable.
The main thing for a summer shower is not to make the floor slippery; it is also important that the materials are of high quality and as little as possible succumb to rot and mold, which often occurs in such showers.