How to build a swimming pool with your own hands: types of structures and their descriptions
In hot weather, at a dacha or suburban area, everyone wants to swim and enjoy the cool water. It’s not always possible to go to a river or lake, so building your own pool Location on will not be superfluous.
Content:
- Swimming pool on site: description and types of design
- Place for a pool: how to choose
- Size and depth of structure
- Materials and tools for work
- Pool construction: step-by-step instructions
Swimming pool on site: description and types of design
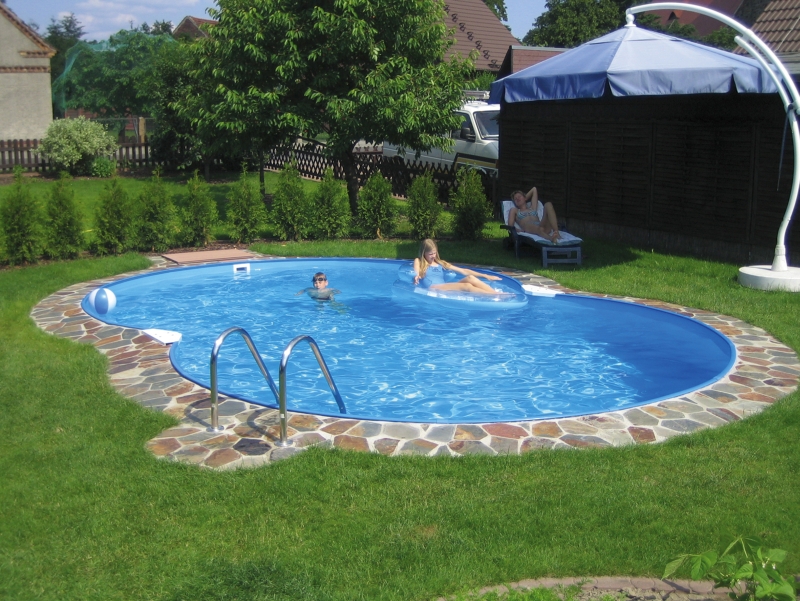
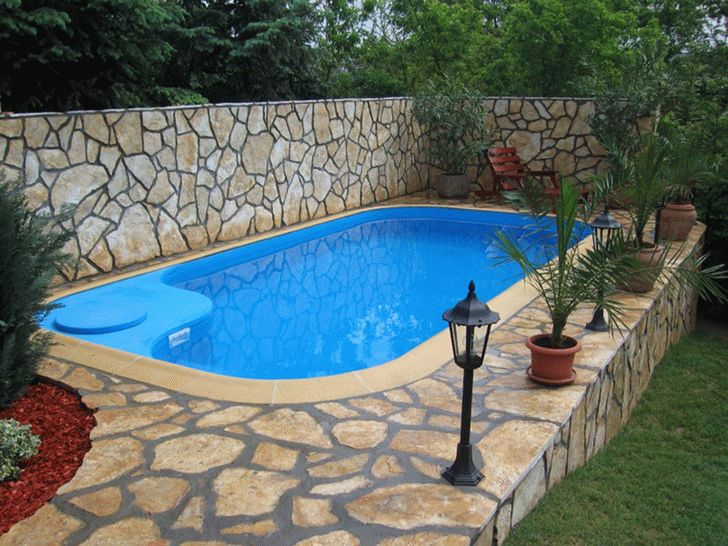
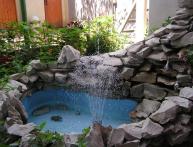
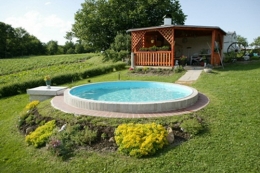
An artificial pond allows you to swim and cool off on hot summer days. The pool will become not only a place for adults to relax, but also for children to play water. In addition, the pool can be used as a storage tank for watering plants. There are several types of construction:
- Stationary
- Collapsible
- Inflatable
Stationary structures are the most reliable and have a reinforced concrete bowl. They are usually installed for a long time and are medium or large in size. Subtypes of stationary models are frame and frameless structures. The pool frame can be assembled within a day. The walls are made of metal steel sheet, and a bowl-shaped PVC film bag is used for decoration.
It is recommended to install collapsible models in unguarded summer cottages.Such a pool is assembled at the beginning of the season, and dismantled with the onset of autumn and stored in a utility room. In this type of design, it is necessary to filter the water. The inflatable pool is also popular. You can place it even in a small area.
This type of pool is convenient to take with you to a picnic, nature, etc. When choosing a pool, you need to decide on the size and shape of the future structure, as well as the installation method. To save money, you can build a permanent pool with your own hands.
Place for a pool: how to choose
Before you start building a pool, you need to decide on its location. It is advisable to choose a site for the pool with a slope of soil. Tall trees should not grow nearby, as the root system can damage the waterproofing.
In addition, leaves will fall from the trees and you will have to regularly clean the bowl of them.
You need to pay attention to which direction the wind is blowing. It is desirable that the air movement passes along the bowl. This will force debris and dirt to the edge, making the pool easier to clean. Taking this into account, the future structure should be placed.
The groundwater level should also be taken into account. The pool should be installed where the groundwater level from the ground surface is 0.5-1 meters. It is also important to consider the type of soil. It is recommended to build a pool on clay soil and in case of waterproofing failure, this type soil will stop water leakage.
Size and depth of structure
The size of the future pool must be determined taking into account its intended purpose. If you plan to build a swimming pool, then it is better to make a rectangular structure.You can't really swim in a round bowl, but it's a good option for splashing around in the water. You can build a structure of extraordinary shape.

The optimal size for swimming in a rectangular pool: width 2.5 meters, length 5 meters. If necessary, you can increase the width to 4 meters, if the site allows. If you plan to dive into the water and jump from the side, then the depth should be about 1.5 meters.
When installing a springboard or tower, the depth should be made greater, with a smooth transition of 1.5 meters. When building a swimming pool for children, the depth should be 0.5 meters. The construction of a pool with transitions to different depths is more difficult to install, and sudden changes in depth should be avoided.
Materials and tools for work
Before you start build swimming pool, you need to prepare materials and tools. To work you will need:
- Concrete mixer
- Carpentry tools set (hammer, knife, wrenches, nails, self-tapping screws, stapler, tape measure, rule, etc.)
- Screwdriver
- Tamping
- Sand
- Cement
- Boards (20-25 mm)
- Bars (40-50 mm)
- Armature
- Waterproofing material
- Primer
- Tile adhesive
Video about building a swimming pool at your dacha with your own hands:
To finish the pool you can use tiles, mosaics, polypropylene, PVC film. The film comes in different colors: turquoise, blue, white, light blue. Polypropylene is highly durable and resistant to aggressive influences. When choosing mosaics or tiles, preference should be given to materials with low water absorption rates. The mosaic will look original and aesthetically pleasing.
Pool construction: step-by-step instructions
The process of installing a pool consists of several stages.The first step is marking the future structure and carrying out excavation work. To begin with, you should mark Location on pool location. To do this, you can use wooden pegs and stretch a rope along them. Next, dig a pit of the required size 0.5 meters larger than the proposed structure for installing the formwork.
Preparation for installation of formwork. Then compact the bottom and walls of the pit and make a cushion of sand: lay a layer of sand 20-30 cm thick and also compact it well. Next, the reinforcement is laid and the frame is tied with knitting wire or crochet.
At the next stage, lay a waterproofing layer on the base and walls of the future bowl. For this purpose, you can use roofing material or bitumen mass. Lay roofing material over the entire surface, including the very top, and then 3-4 layers of bitumen mass on top of it.
Installation of a drainage system. You can drain the water to the sewer. This is the simplest and easiest way. To do this, install a drain in the structure and connect it to the sewer system. The pipes must be laid and routed in the correct direction with a certain slope. Only after this do they move on to installing the formwork.
Creating formwork and filling the bowl. Installation of formwork is carried out from scrap materials. Next, the concrete mass is poured. The walls are filled in layers. As soon as the concrete hardens, the formwork is removed. This may take 2-3 weeks depending on weather conditions.

Laying the waterproofing layer and finishing. Then a layer of waterproofing is applied. You can use film, mastic or other similar material. To finish the corner part of the pool, use a specialized tape. This will help protect the corners from leaks.Next, they begin finishing work: laying ceramic tiles, PVC film, etc.
Equipment supply. If desired, you can use additional equipment for the pool: lighting, water purification device, heater. At the final stage, you should arrange the area around the pool. Build an artificial pond with your own hands It’s not difficult at all, the main thing is to follow the sequence of work.