Snail greenhouse: manufacturing technology
A small portable greenhouse is a great find for gardeners who do not want to waste time and energy on creating a large greenhouse. The “Snail” greenhouse is especially popular. It will be useful in the spring so that temperature changes do not greatly affect seedlings. This design can be easily made with your own hands according to the drawing.
Content:
- Greenhouse "Snail": description
- Advantages and disadvantages
- What you need for work
- Step-by-step manufacturing instructions
- Useful tips
Greenhouse "Snail": description
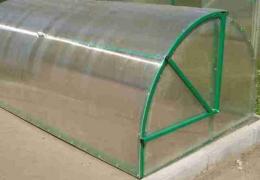
The main feature of this type of construction is the arched roof. Its shape resembles a shell-shaped greenhouse. The only difference is in the sash: one opens, and the second is motionless. This design acts in the same way as a semicircular breadbox lid, which is why the greenhouse also has another name: “Breadbox”. The sidewalls in the “Snail” are tightly closed, and the axis of rotation of the upper sash is located at the end of the vertical pipe.
The length of the greenhouse is about 2 meters and the depth is about 1 meter. In this case, the height of the structure can be within 75-85 cm. This portable greenhouse light and compact. This design allows you to grow any seedlings. The arched greenhouse protects the seedlings from the rays of the scorching sun and helps maintain optimal air temperature. Polycarbonate is most often used for coating. This material is more durable and does not require replacement every year.
Advantages and disadvantages
The main advantages of this design are ease of maintenance and functionality, as well as resistance to external factors, low weight and ease of manufacture. Thanks to the hinged lid, you can easily access the seedlings and carry out the necessary agricultural activities. In the Snail greenhouse, warm air is concentrated in the upper part, so the plants do not mate.
In such a compact greenhouse you can grow not only vegetables and berries, but also flowers.
This structure does not need to be fixed to the foundation, so it can be placed anywhere on the site. The greenhouse is stable even in strong gusty winds. After the end of the summer season, the greenhouse can be easily disassembled. In addition to its positive characteristics, “Snail” has disadvantages. In this design there is no possibility grow tall plants, due to the low height of the greenhouse.
There may also be difficulties when tying up plants. If you use film material as a coating, the design will become less functional. The hinges will need to be checked and lubricated regularly from time to time. It is not recommended to grow plants in such a structure in winter. In severe frosts, the greenhouse may be subject to deformation.
What you need for work
To make a frame, you will need profile, plastic pipes or wooden beams. The cross-sectional size of the pipe should be 2x20 mm. You will also need the following materials:
- Awnings
- Polycarbonate
- Bricks
- Boards
- Sleepers
To assemble a metal frame you need a welding machine, a drill, a hacksaw and a pipe bender. If you plan to create a wooden structure, then the tools you should prepare are a saw, a screwdriver, a knife, a hammer, and a level.
Step-by-step manufacturing instructions

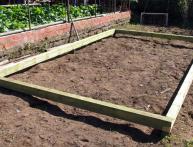
Creation technology greenhouse The “snail” consists of several stages. Pouring the foundation. First you need to mark the boundaries of the future structure and dig a trench. Next, lay a layer of crushed stone, lay bricks around the perimeter and fill with concrete. You can also make formwork. After the foundation has dried, remove the boards and add fertile soil.
You can make a wooden foundation. It can be easily moved to another place. To create a foundation of this type, lay out bars measuring 150 cm x 150 cm and deepen them into the ground along their entire length. In this case, the corners need to be bolted together. After this, a greenhouse is installed.
Preparation of arches. Take 2 profile pipes, one meter each, for the moving part and 2 blanks measuring 1.6 meters. Using a special tool - a pipe bender, make 4 arcs.
Next, mark the middle on the side of the frame. Foundation device. Assemble the lower frame according to the drawing and weld at the corners. Next, weld the side parts and mark the middle again. Weld the ends of the pillars along the two centers marked with a marker. In this case, the frame hole should be on the outside.
Installation other parts of the structure. Weld moving parts - side arcs and cross bars. In order for the doors to open using a hinge, axial strips need to be welded to the moving elements. Pre-cut them at an angle of 45 degrees. Attach the resulting structure with self-tapping screws to the foundation.
Video about the greenhouse "Snail":
Fastening polycarbonate sheets. Cut polycarbonate sheets according to the size of the openings. In total you will need 6 pieces: for the side parts, the roof and the blind part. The polycarbonate is attached directly to the frame using self-tapping screws.
The construction of a “Snail” greenhouse requires compliance with the sequence of work. If all recommendations for making a greenhouse are not followed, errors may occur. The most common is using the wrong lintels to secure the roof and foundation.
They come in different lengths and are designed specifically for roofs and foundations. The jumpers need to be assembled first. It should be taken into account that the holes are at the same distance. Please allow a slight error of 4mm. Otherwise, the roof will be skewed.
Forming a base without using stakes. The end result greenhouse will be uneven. Be sure to use pegs and level the base of the structure using a level.
No gaps in the side. Gaps are needed for normal air distribution in the greenhouse. The optimal size is about 2-5 cm.
Useful tips
To increase the functionality of the greenhouse structure, fill the foundation base with manure, dry grass or leaves on both sides of the greenhouse. Over time, the organic material will begin to rot. This will generate heat, which will ensure the creation of natural conditions for heating the soil. A bar with brushes can be installed on the fixed part. Each time a moving element is operated, the brushes will remove dust and dirt.

When opening the greenhouse, it is recommended to secure the moving element with supports. It can be made from wooden beams. This will avoid injury if the sash lowers on its own in strong winds. When choosing polycarbonate, it is better to choose a material with UV protection. Such polycarbonate will not only last a long time, but will also protect seedlings from exposure to sunlight.