Homemade branch chopper: description and advantages of the device

Trimming removing old and dried branches on trees and shrubs is an important garden care measure. When a large amount of brushwood accumulates, you want to use it for business. The most practical way is to send it for composting. To speed up this process, you can use a homemade chopper.
Content:
- Branch chopper: description and purpose in gardening
- Design advantages
- Required materials and tools
- Step-by-step instructions: main stages of work
Branch chopper: description and purpose in gardening
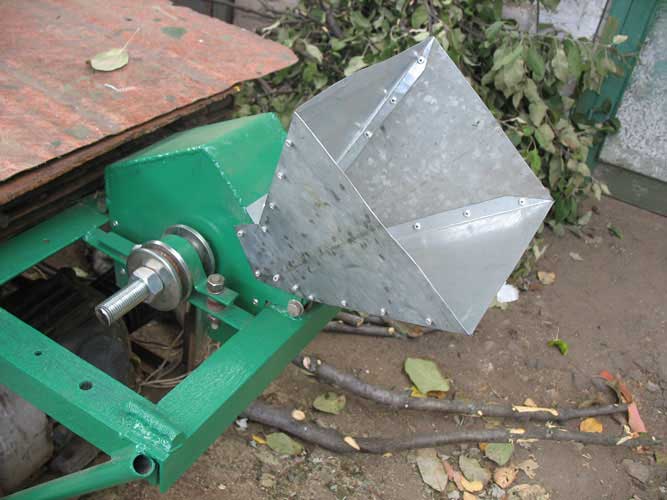
The design of the chopper is simple. The main components of the shredder: motor, working shaft with knives, metal frame, box, protective casing. The working shaft is the main working element that chops the branches. This cutting shaft has a thread diameter of 20mm.
The block contains circular saws with teeth. There is a gap between them that prevents the teeth from meeting each other. To set the cutting unit shaft in motion, you need a motor. The power of the electric motor should be about 2.5 kW, which will allow you to chop thick branches, the diameter of which is about 5 cm. With higher power, the device can process thicker branches.
Using a belt drive, you can set the required rotation speed. In order to supply branches to the working shaft, a receiving box is required.To cover the rotating and cutting elements you will need a protective casing. It can be made of light metal. All structural elements are mounted on a metal frame.
The principle of operation of the device is similar to a meat grinder: branches or other waste are crushed into chips or sawdust.
Design advantages
Such a device on the farm allows not only to chop branches, but also any waste: tops, stems sunflower etc. The owner does not need to burn wood waste.
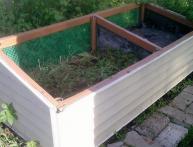
With the help of a chopper, branches are crushed into small pieces - sawdust, chips, shavings. This gardening tool allows you to obtain mulch for the soil at your summer cottage or use the crushed remains for heating your home. In addition, they can be placed in compost pits and ultimately become fertilizer.
The advantages of this device include:
- High performance
- Easy to install
- Processing of materials of various diameters
- Long blade life
- Easy maintenance
- Hardwood Shredding
The cost of such a device is quite high and not every gardener can afford it. In this case, you can build a chopper with your own hands. This is labor-intensive work and cannot be done without carpentry skills.
Required materials and tools

Make a wood chipper with your own hands you can do it yourself. To do this, you should draw a diagram and drawing of the future design, purchase the necessary tools and materials, and you can start working. To assemble the frame you will need the following materials:
- Round pipes (diameter 32-48 mm)
- Two corners (35 mm each)
- Profile pipe (40x40 mm)
- Single corner (width 50-63 mm)
- Channel (No. 6.5-10)
- Circular saws (25 pieces, outer diameter 180 mm, inner diameter 20 mm.)
- Spacer washers (diameter 20 mm)
- Bearings
- Skiffs (2 pieces)
Also, to assemble the structure you will need a steel circle (diameter 40-50 cm), a galvanized steel sheet for the casing, bolts, nuts, and screws for fastening. Don't forget to purchase a drive belt.
Necessary tools for work:
- Welding machine
- Metal scissors
- Bulgarian
- Keys and screwdrivers
- Metal brush
The engine can be chosen gasoline or electric. The first type of engine allows you to process large-sized waste. In addition, he is very mobile. The second option is easier, but is tied to electricity. The engine should be selected with a power of about 4 kW. When all materials and tools are prepared, you can begin assembling the shredder.
Step-by-step instructions: main stages of work
Manufacturing The grinder consists of several stages.
Frame assembly. Take a profile pipe and use a grinder to cut the components of the future frame - 4 elements 40 cm long and 2 elements 80 cm long. Weld the short parts between two long ones at an angle of 90 degrees. In this case, the two transverse parts must be placed at such a distance that the drum is securely installed.
Construction of a receiving bunker. This structure must be durable. Galvanized steel is used for production. Cut 4 pieces in the shape of a trapezoid and weld together. At the bottom of the box, make 4-5 cm bends for fastening. It is important not to forget to make holes for fastening.
Installation should be carried out in such a way that the box can be removed to clear large wood debris, sharpen knives or clean the mechanism.This is an important condition that should be observed when constructing a receiving hopper in order to facilitate cleaning of the structure.
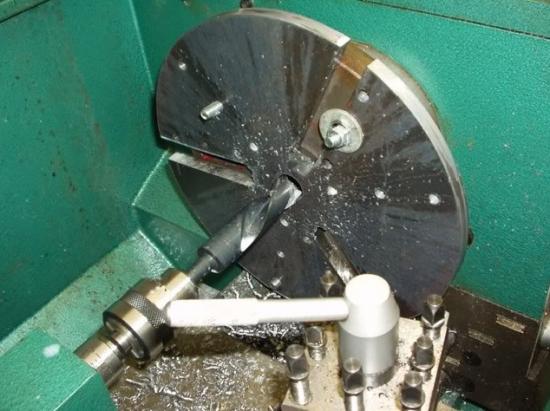
Making a chopper. Circular saw blades are threaded onto a stud with an M20 thread, placing washers between them. The rotation of the circular saws will be carried out using bearings from the VAZ intermediate shaft. Secure the saw with nuts on both sides.
Next, the fasteners for the bearings are welded on the frame cross members. Place the bearings on the stud and secure them, and then install the saws on the frame and also secure them. On the cutting block for protection put on the metal casing.
Motor installation. The electric motor will be mounted using bolts to the elongated holes in the frame. To install a tension mechanism, drill holes at the two ends of the angle that are commensurate with the bolts. Insert the tension bolts into the slots and attach.
The tension of the belt depends on the tightening or loosening of the nuts on the bolts. At the final stage, attach pulleys to the protruding ends of the motor and shafts. The process of creating a wood chipper is not difficult if you have minimal carpentry and joinery skills and follow the drawing.
Video about how a homemade shredder works: