Do-it-yourself artificial pond: myth or reality?
Everyone strives to equip their summer cottage in order to create an atmosphere of coziness and comfort, which promotes relaxation from the noisy city and the modern rhythm of life. You can create an artificial pond of any size, and modern materials allow you to do everything yourself.
The main difference between a garden pond and a swimming pool is the water. The water in the pool undergoes special purification and chlorination, while the water in an artificial pond requires the creation of a special microenvironment. Otherwise, the pond owner risks getting a swamp with frogs and muddy water.
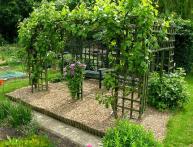
If the landscape of the garden plot is made in the style of geometric, straight, strict lines, then the pond must be made in a square or rectangular shape. For additional decoration, as a rule, tile stone is used, which can be natural or artificial, which is installed along the edges of the pond.
Content:
- Types of Ponds
- Technology for creating an artificial pond with your own hands
- Choosing plants for the pond
Types of Ponds
Ponds that have the correct geometry can be located above the ground. The main advantage of artificial reservoirs of this type is the minimal time and financial costs for excavation. They are safe for small children, easy to care for and attractive in appearance. In such a pond you can organize a fountain, and place small flower beds or install seats on the sides.
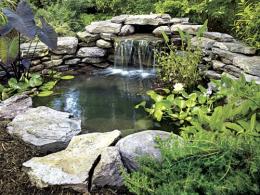
The second type is a pond that completely imitates a natural body of water. It has rounded shapes and a somewhat “curved” coastline. Plants that are characteristic of a swamp habitat are planted around such a pond. Such a reservoir requires large costs to create, since in this case it is necessary to use a small dug pit.
Technology for creating an artificial pond with your own hands
Do-it-yourself artificial pond is not a myth, but a reality. If you follow all the steps carefully, you can create a beautiful pond yourself:
- Creating a plan. The plan should show the reservoir with its exact shape and parameters, and the places where decorative elements will be located in the future should be marked. Determine what exactly will be the accent in the pond, for example, a fountain, a sculpture, or just a beautiful stone along the edges of the pond.
- At the second stage, it is necessary to mark the contours of the pool directly at its future location. You can use a hose or sand for this. The main thing is that the banks of the future reservoir have the same level of location. After applying the markings, it will be necessary to begin digging a pit, which will have the dimensions indicated in the plan. In order to be sure of the accuracy of the formation, it is necessary to carry out measurements with a water level or ruler during the process.
- Excavation. The pit is dug to the depth of the coastal tier, where a line is marked, then the pond is deepened to another mark below. As soon as the work on creating the second tier is completed, a line is laid, after which the deepest part of the pond will be located. The final one is being dug layer of earth. For digging, you can use the professional services of an excavator, which will greatly facilitate and speed up the process of creating a pond. To pump out groundwater, it is worth using a small pumping apparatus.
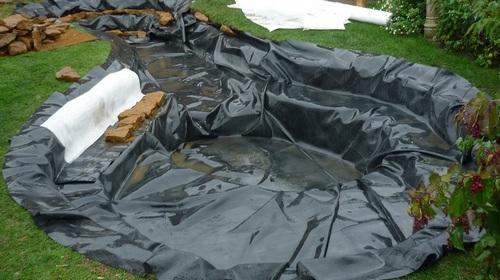
As soon as all the excavation work is completed, it is necessary to measure the size of the pit, taking into account all its dimensions and add to this 50 cm on each side for the overlap. All these values are necessary for further film acquisition. A shallow trench should be dug along the perimeter of the reservoir.
The resulting pit should be lined with moisture-resistant film. In order to provide this film with protection from stones and plant roots, an additional layer of geotextile is lined, and the film itself is installed on top of it. The edges of the film are tucked into a pre-dug trench.
For establishing the film It is best to choose a warm and sunny day, since exposure to water and ultraviolet rays makes the material more flexible and, accordingly, lining it is much easier.
The edges of the film, which are laid in the trench, must be secured with ordinary crushed stone. This will provide a secure hold for the film.
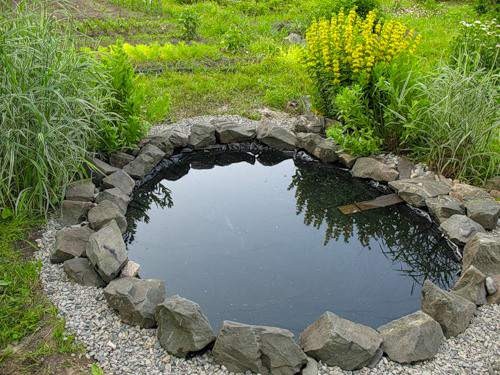
The edge of the pond must be reinforced either with pipes or plastic, or with stone blocks. In this case, earthlings will fall from the coastal zone into the pond. The edge of the pond should be decorated with decorative stone; it can be either artificial or natural.
The bottom of the pond is lined with crushed stones and stones. Plants that were previously marked on the plan are installed in special plastic containers on the curtains.
The pond is filled with water.
A pond will truly please the eye only when there is always clean water in it.To do this, it is best to equip the reservoir with a small stream, which will ensure constant circulation of water. And to replenish the water volume you can use garden hose, which can be disguised between stones and plants. More complex designs require the presence of a small pumping station that will regulate the volume and flow of water.
Choosing plants for the pond

In order for the pond to be truly beautiful, it is necessary to select plants that will serve as its decoration. If you are creating a small pond, then it is best to choose plants that will float on the water surface, and in moderation. These plants include:
- dwarf water lilies
- water hyacinth
- buttercup
- duckweed
All these plants perform not only an aesthetic function, but they also saturate the reservoir with oxygen. When choosing plants, you need to pay attention to such a fact as the speed of their growth and reproduction.
There are a number of plants that grow very quickly and can literally in two months turn your pond into continuous thickets that will cover all the beauty of the reservoir. If you decide to plant plants that will grow directly in the pond itself, then you need to take into account the depth of their planting.
When digging a pit, a fairly large volume of earth remains, which can be used to improve the pond. For example, you can create a small embankment and install a fountain, or just a beautiful sculpture or composition of boulders. Many people simply use this soil to level the entire area.
Making a pond with your own hands is a very real task that will allow you to create a beautiful relaxing place in your garden.This does not require large financial investments; you need the desire to create beauty, but also physical capabilities. The main thing is not to forget about changing the water and caring for the plants in the pond. Then he will delight you with his beautiful appearance for a long time.
Video on arranging a pond at your dacha with your own hands:

Interesting information about the vegetable garden


Comments
The dream is a pond like this in the country. But I understand that making it is painstaking work, and it also requires constant care.