Beautiful rose grafted onto a rosehip

Roses are very drought-resistant crops that fit well into any garden landscape. Let's figure out how difficult it is vaccinate this plant and what it will take.
Content:
Grafting technique
I want to tell you how I grafted my roses onto rosehip bushes. I’ll say right away that there is nothing complicated about this, it just sounds scary! For those who don’t know, I’ll first explain what a rootstock and scion are. The scion is the part of our rose that we will graft, respectively, the rootstock is the rosehip on which we will graft that same rose.
Spring is the best time for vaccination, as well as mid-summer.
Grafting roses on the rosehip happens as follows. We prepare the rootstock. We rake the soil from the roots and wipe the neck well with a rag. We make a T-shaped cut on the neck; it is better to make it with a special budding knife. It is better to make the cut not from the sunny side of the plant.
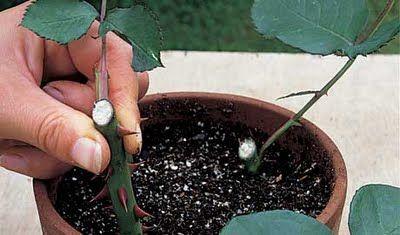
The easiest time to select a suitable plant for grafting is when the buds are just opening. Almost all the buds on such shoots can be suitable for budding at this time. The leaves are removed from the stem.
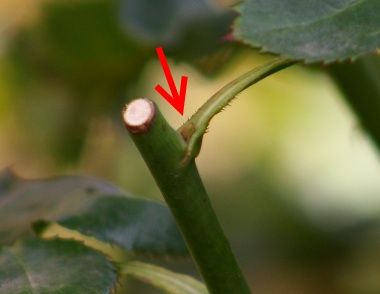
A sharpened grafting knife is held from below the marked bud. Then, from the bottom up under the bud, the scutellum together with the tail is cut off with a shallow cut. So, from the rose shoot (scion), which we will graft, we cut out an eye with a piece of wood, three to four centimeters long. The wood cut should be oblique.
Using a knife, carefully spread the cut bark on the neck of the rosehip and insert a peephole there. We press the remaining pieces of wood tightly against the root collar and wrap them with electrical tape. Before winding, the protruding tip of the shield must be carefully trimmed. If the tape is made from non-volcanic rubber, it will crumble by the time the graft grows together. Such a ribbon will not need to be specially cut from the plant: the rapidly developing neck will easily tear it apart over time.
Important! We leave the eye open! Sprinkle with soil and water a little. We wait about four weeks. If we see that the bud is green during all this time, then the grafting of roses onto rose hips was done correctly!
In order for the grafted rose to overwinter well, before the onset of cold weather, you can dig it in with earth and cover it with leaves.
The bud may begin to grow in the current growing season, but most often its development will begin at the beginning of the next year. The upper part of the shoot should be cut off just above the bud in the spring. This will prevent the possibility of growth (savages) forming.
Standard rose
For growing and shaping standard roses choose a wrinkled rose as a rootstock. She should already have a large single shoot from 1.5 to 2.5 meters. Typically, shoots ready for grafting are planted in a row in the fall. Then they make a trellis of wire or mesh, stretched on posts.

Budding begins next summer, when the bark on the plants is well removed. Usually 2-3 eyes are grafted onto the scion. They are placed close to each other in a spiral. It is this arrangement that allows you to get a beautiful crown of a classic shape.
The desired height of the trunk determines the height of the budding. Usually a standard is formed at a height of one meter.There are semi-standard forms - about 80 cm, and sometimes lower.
Butt budding
Budding in the butt is used when the wood of the shoots has matured quite well. It can be carried out during the season at any time, provided that the selected shoots already have formed buds and the temperature is not lower than 10 degrees. Such conditions are necessary for the rapid fusion of graft parts.
From the plant from which the bud is taken, shoots of the current year are cut off, at the base of which there is a mature bud. The young top is removed from the cuttings, and all leaves are cut off from the shoot.
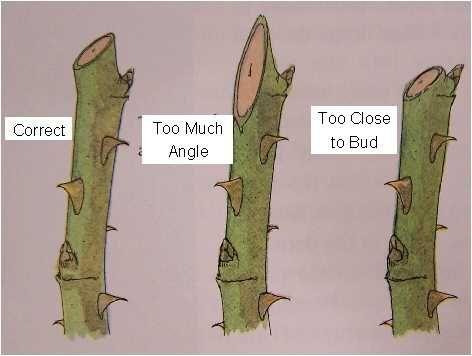
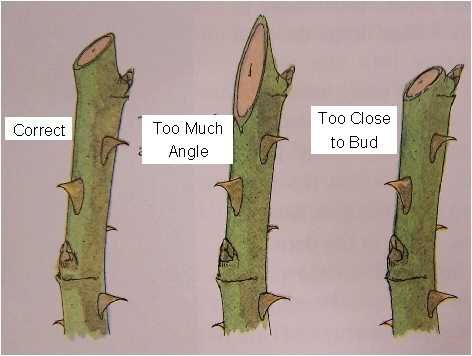
At an angle of 45 degrees from top to bottom, a cut of about 6 cm is made on the stem of the rootstock. And above, another cut is made, which must begin 3 cm from the end of the first and lead it down and inward until it intersects with the first. Remove the formed shield.
For grafting, a trunk of the same diameter as the rootstock is selected from cuttings. This is necessary to align the scion shield with the previously made cut on the rootstock. Then, from this cutting, the same shield is cut out as on the cutting of the rootstock. The kidney should be in the middle.
A shield with a bud is inserted into the socket, and the place of the produced vaccinations tied with plastic tape. To protect against drying out, it is important to tie the budding area well, tightly closing the edges of the cuts.
The tying tape is removed after a month, when the bud has fused with the rootstock. The upper part of the rootstock is carefully cut off next spring, being careful not to damage the graft. If budding (grafting) was carried out in the early stages, then the bud may begin to grow in the current year, and if it is late, then it will begin to grow next year.
As you can see, grafting roses is not at all scary.You can graft a bud into the root collar, you can form a beautiful trunk, or you can graft the butt. These are fascinating methods of plant propagation that any gardener can do. Try it yourself, and you will certainly succeed!


Comments
What a gorgeous rose made from rose hips! We also have one of these growing at our dacha, but a little smaller, although we didn’t graft it onto rose hips, but immediately bought a sprouted cutting and now it pleases us with its beauty.
I would like to add that when using electrical tape, you need to wrap it with the sticky layer on the outside. Better yet, use plumbing tape. I use it for all types of vaccinations.