Landscaping a summer cottage with your own hands: tips and recommendations
After purchasing a dacha plot, the owners are faced with the main task of improving the territory. This is an important stage of design, on which the aesthetic appearance and comfortable stay in the house will depend.
Content:
- Improvement: features of implementation
- Do-it-yourself lawns: stages of work
- Construction of a gazebo: step-by-step instructions
Improvement: features of implementation
Landscaping summer cottage involves the implementation of a set of measures that are aimed at improving its environmental and sanitary condition.
Basic recommendations for landscaping a suburban area:
- The area around the dacha can be landscaped in different ways. There are various ideas for decorating a garden and local area. However, this should be done taking into account the structure of the house in order to maintain integrity and harmony.
- When decorating a summer cottage, various decorative elements are used: benches, arches, gazebos, tall vases, etc.
- The use of stone in landscaping provides great decorative possibilities. With their help, you can make various structures, fences, lay out a path or border. Stone looks very original when creating landscape compositions.
- It is important to avoid an overabundance of various plantings, furniture and other items, as chaos will be felt on the site.
- If trips to the dacha are carried out only on weekends, then it is not recommended to plant plants that need constant care.
- It is advisable to separate the recreation area from the flower area with any fence or wall.
- If the dacha is used for permanent residence, then you can plant lawn grass or shrubs.
It is important to plan the territory in advance: decide on the location of the gazebo, lawns, paths, landscape compositions, etc. Landscaping needs to begin with cleaning the area. All dry leaves are removed from the site, stumps are uprooted, trees are cut down, branches are removed, stones and debris are removed. Next, you need to level the area.
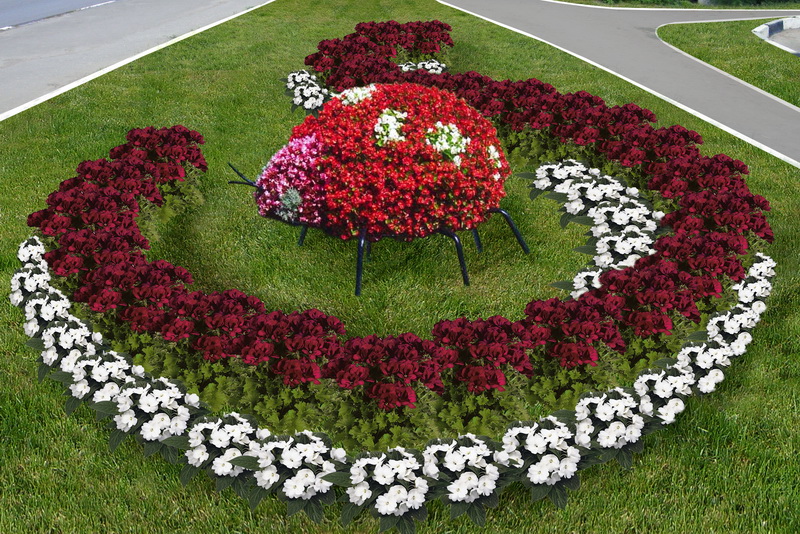
Do-it-yourself flowerbeds and lawns: stages of work
The lawn is increasingly used as a landscaping element. It can occupy the entire area of the house or be part of a separate composition, for example, a green island under a tree. Grass cover can be grown naturally or created artificially. After cleaning the area, you can begin landscaping with a lawn. First you need to dig up the ground to a depth of about 20 cm. The surface should be leveled, since caring for the lawn will be very difficult.
At the next stage, the soil is fertilized. It is recommended to use an all-purpose fertilizer. Before planting the seeds, you should loosen the top layer. Planting must be done on a calm day, as the wind can blow away the seeds. Cover the sown seeds with soil. You will need about 40 g per square meter. At the final stage, water the seeds using a sprayer. It is not advisable to perform this procedure using a hose and bucket.
With the help of flower beds and flower beds you can create a bright and original design. Difference flower beds and flower beds in uniform: the first option is performed in strict form, and the second in loose form. To create a flower bed, you need to decide on a location. You need to draw a sketch of the flowerbed in advance and divide it into sectors. Next, paint each sector with a certain color and sign which plants will be located in each sector.

It is important that the flowerbed does not blend into the surrounding environment, so it should be located on a hill. A simple version of a flower bed is made from old tires. To work, in addition to tires, you will need a sharp knife, paints, metal mesh, stones and other decorative elements. The easiest way to make a flower-shaped flower bed is to use a tire. The rubber needs to be cleaned, washed and dried. Next, draw a line for the future petals and cut along the contour.
Then you can start painting. For this purpose, use nitro paint or oil paint. It is advisable to choose light colors so that the plants in the flower beds do not overheat. If desired, you can decorate the tire with stones. It will look original and beautiful.
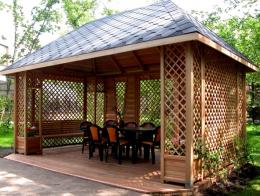
Construction of a gazebo: step-by-step instructions
Gazebos are very often erected when landscaping a dacha area. In hot weather it will protect from the sun's rays, and in cloudy and rainy weather it will become a place of shelter from the rain. You can build a gazebo out of wood with your own hands. The following tools and materials are required for construction:
- Bars
- Boards
- Reiki
- Soft tiles
- Concrete mortar
- Screws
- Nails
- Hammer
- Shovel
- Roulette
- Pegs
- Twine
Video on how to build a gazebo with your own hands:
After purchasing the necessary materials, you can begin to build a gazebo.Immediately before work, it is necessary to prepare the area: clear debris, remove weeds, remove topsoil. An ordinary gazebo has standard dimensions of 2x3 meters.
The main stages of operation of the gazebo device
Laying the foundation. Mark the corners around the perimeter according to the drawing and dig holes for the posts. They are buried 45-50 cm into the ground. Next, crushed stone is poured into the holes and compacted well. Secure the beams in the holes using slats in a horizontal position. The next layer is gravel. After this, pour concrete solution and form a small hill around the perimeter so that the slope is in the direction of the pillar.
You should wait a few days for the concrete to harden, only then proceed to the next stage. Construction of the floor, walls and roof. All wooden elements must be impregnated with a special antiseptic solution. The poles are tied with timber. To obtain an even strapping, a longitudinal notch is cut along the side of the beam. The notch should be rectangular.
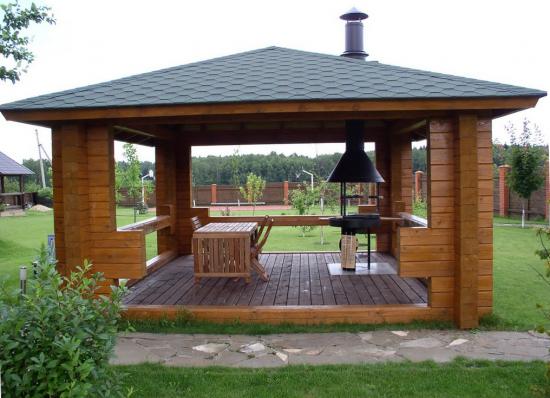
The floor can be slightly raised above the ground or placed flush with the ground. In the first case, stretch a 100x100 mm beam between the support pillars. For additional screed you will need a beam measuring 100x50 mm. An edged board is installed on the base, and then steps are made. In the second case, paving stones are used for the base. The roof can be made gable or hipped. The first type is made of four rafters connected to each other by a horizontal cross member.
For a hipped roof, one rafter is laid from each corner, and then four rafters from the center on each side. The top of the roof can be covered with tiles. A drain should also be provided to drain the water.
Interior decoration. One wall should be made blank, which will not allow you to hide from a strong gust of wind. Finishing is done using drywall, lining or plaster. Work should only be carried out in dry weather. If you plan to install electricity, then this needs to be taken care of before finishing the finishing work. It is important to follow safety precautions. You can place the gazebo next to an artificial or natural reservoir, especially since the watery landscape has a calming effect.